synctools
  • Integrations
    Shopify
    WooCommerce
    Linnworks
    Shopify and QuickBooks Shopify and XERO Shopify and Sage Shopify and NetSuite Shopify and ZohoBooks Shopify and Business Central
    WooCommerce
    WooCommerce and QuickBooks WooCommerce and XERO WooCommerce and Sage WooCommerce and NetSuite WooCommerce and Business Central
    Linnworks
    Linnworks and QuickBooks Linnworks and XERO Linnworks and ZohoBooks
  • For Accountants
  • Pricing
  • Resources
    Help Center
    Blog
    Demo Videos
Sign in Book a Demo Free Trial
×

Sign in starting channel for connection

Shopify WooCommerce Linnworks
×

Start simply with one channel

Adding more is easy within your trial period.

Shopify WooCommerce Linnworks

Shopify Xero Integration

9
  • Shopify + Xero Advanced Accounting Scenarios
  • Shopify + Xero setup tax threshold limits
  • How to Reconcile shopify payouts with Xero
  • How SyncTools Converts Foreign Currency to Your Home Currency for Accurate Reconciliation
  • Shopify + Xero Transaction Categorization using Auto Mapping
  • Shopify + Xero Grouping by Sales Channel, Gateway, Country.
  • Shopify + Xero Online COGS setup
  • SyncTools Shopify to Xero Integration Guide: Configuring Summarized Sync
  • SyncTools Shopify to Xero Integration Setup Guide

Shopify QuickBooks Integration

11
  • The Complete User Guide to Integrating Shopify with QuickBooks
  • Shopify + Quickbooks Online setup tax threshold limits
  • How to Reconcile shopify payouts with Quickbooks Online
  • How SyncTools Converts Foreign Currency to Your Home Currency for Accurate Reconciliation
  • Shopify + Quickbooks Online Transaction Categorization using Auto Mapping
  • Shopify + Quickbooks Online Deferred Revenue setup
  • Synctools: Shopify Cost of Goods Sold (COGS) Integration with QuickBooks
  • Shopify + Quickbooks Online Grouping by Sales Channel, Gateway, Country..
  • How to Setup Shopify + QuickBooks Integration
  • Shopify + Quickbooks Online Configuration Guide for Summarized Journal
  • Shopify + Quickbooks Online Advanced Accounting Scenarios ( Return, Refund, Return Fees, tax )
View Categories
  • Home
  • Docs
  • Shopify Integration
  • Shopify Xero Integration
  • SyncTools Shopify to Xero Integration Setup Guide

SyncTools Shopify to Xero Integration Setup Guide

AI Doc Summarizer Doc Summary
AI Doc Summarizer Thinking Thinking

Welcome to the SyncTools integration setup guide.

In this article, you will learn how to easily connect your Shopify store to Xero using SyncTools. This guide will walk you through each step to get your accounting automation up and running quickly.

Step 1: Start your Free Trial

SyncTools homepage highlighting multichannel eCommerce accounting with free trial and demo call-to-action buttons.
  • Begin by visiting the Synctools website.
  • On the homepage, locate the “Free Trial” button to start the process.
  • Click on the button to initiate the signup process.

Tip: Starting your trial gives you full access to the integration features without any obligation.

Step 2: Choose Your Platform
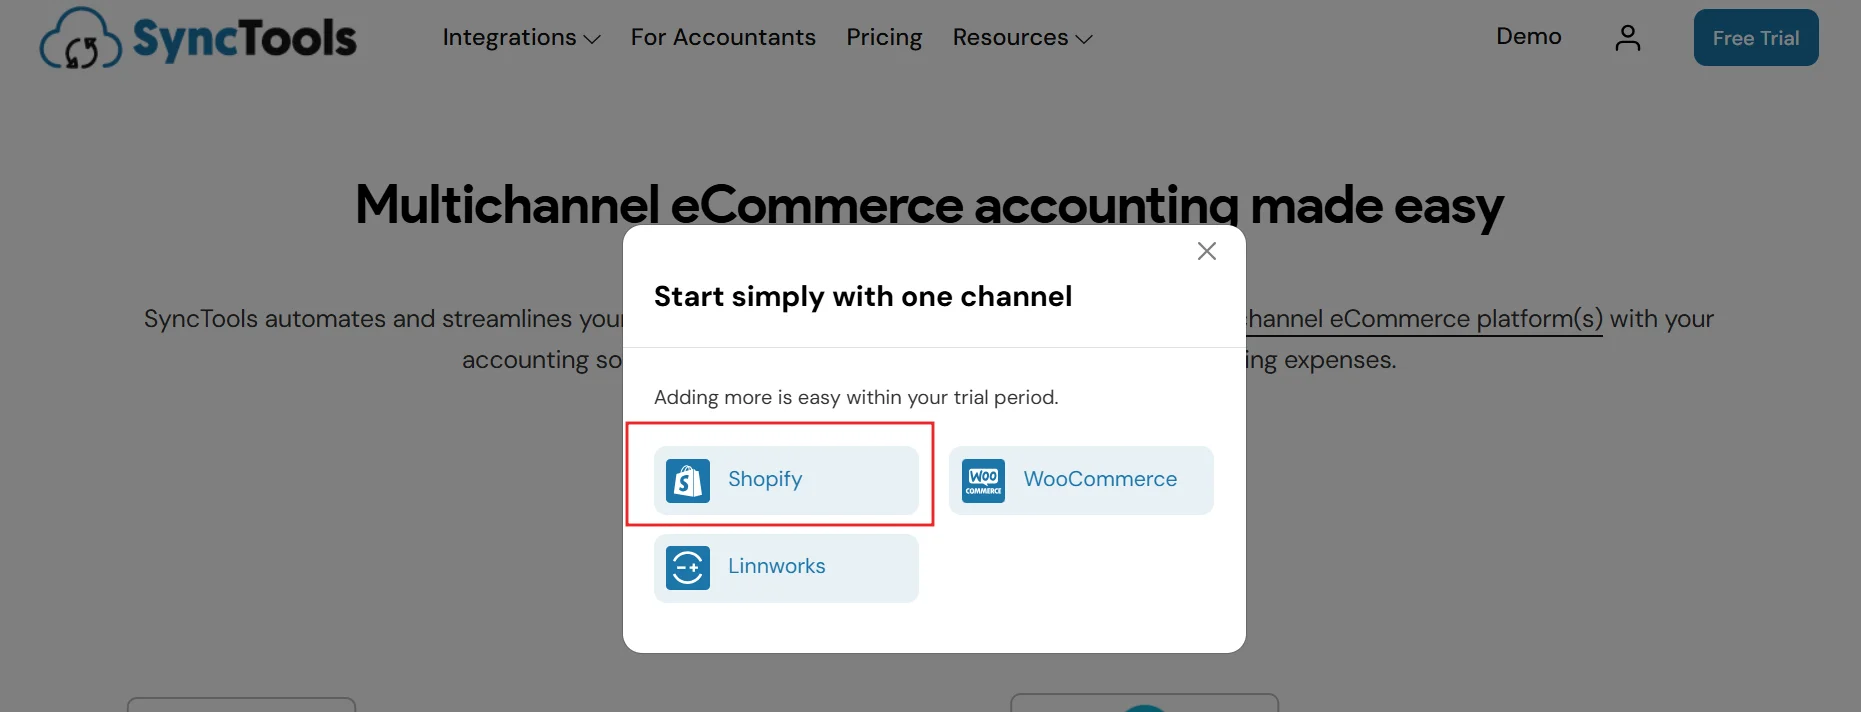
SyncTools free trial interface prompting users to start with one sales channel like Shopify, WooCommerce, or Linnworks.
  • After signing up, you’ll be prompted to choose your eCommerce platform.
  • Select Shopify from the list of available platforms.

This will enable SyncTools to connect directly with your Shopify store.

Tip: Make sure you have admin access to your Shopify store before proceeding with the integration.

Step 3: Enter your Email Address
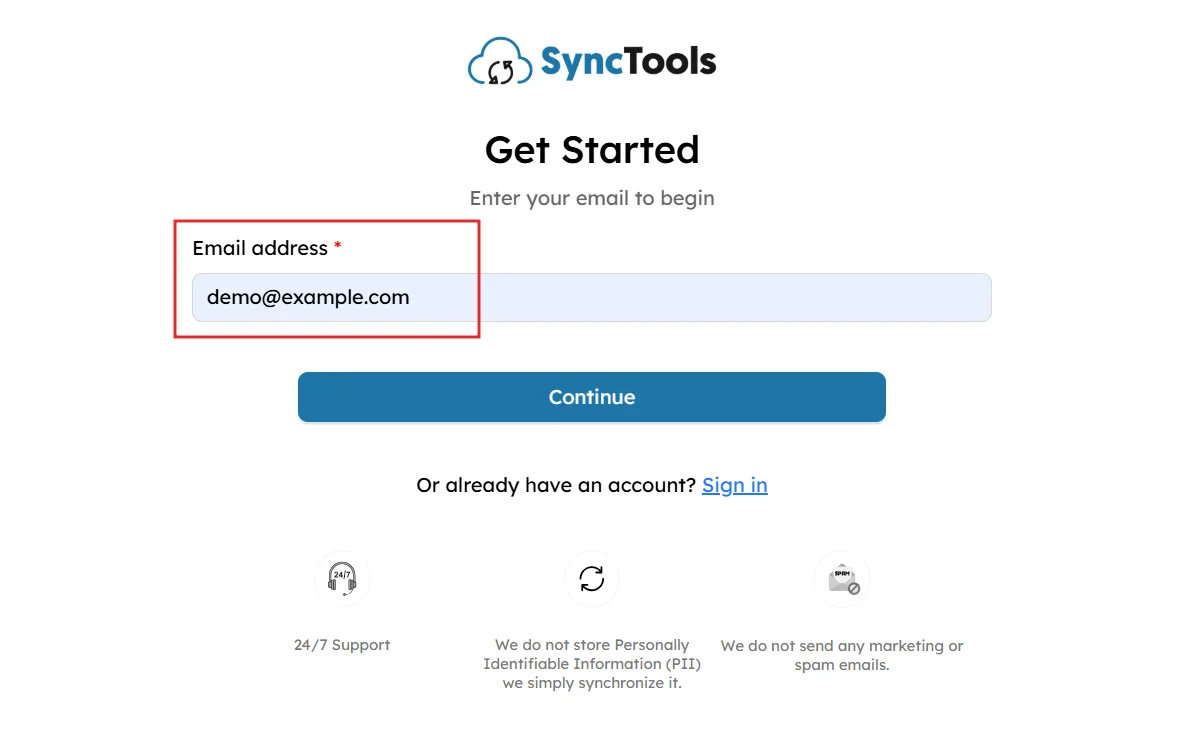
SyncTools signup screen prompting users to enter email address to begin trial, with support and privacy policy info shown below.
  • After selecting Shopify, you will be redirected to the Synctools Sign Up page.
  • Enter your email address to begin the sign-up process.
  • After entering your email, click Continue.
  • If you already have an account, click on “Sign in.”

Step 4: Verify the email address
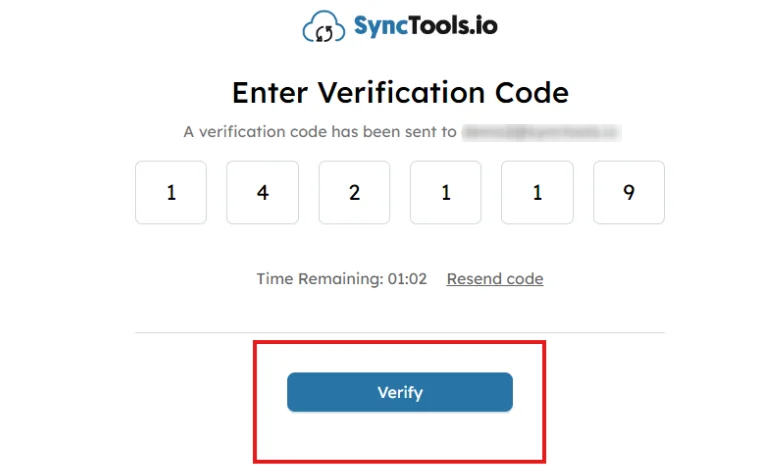
SyncTools verification screen for entering 6-digit code sent to email, with timer countdown and verify button highlighted.
  • SyncTools will send a verification code to the email you provided.
  • Enter the code on the SyncTools website to verify your email address and proceed with the setup.

Tip: Check your spam folder if you don’t see the email in your inbox.

Step 5: Select Your Role
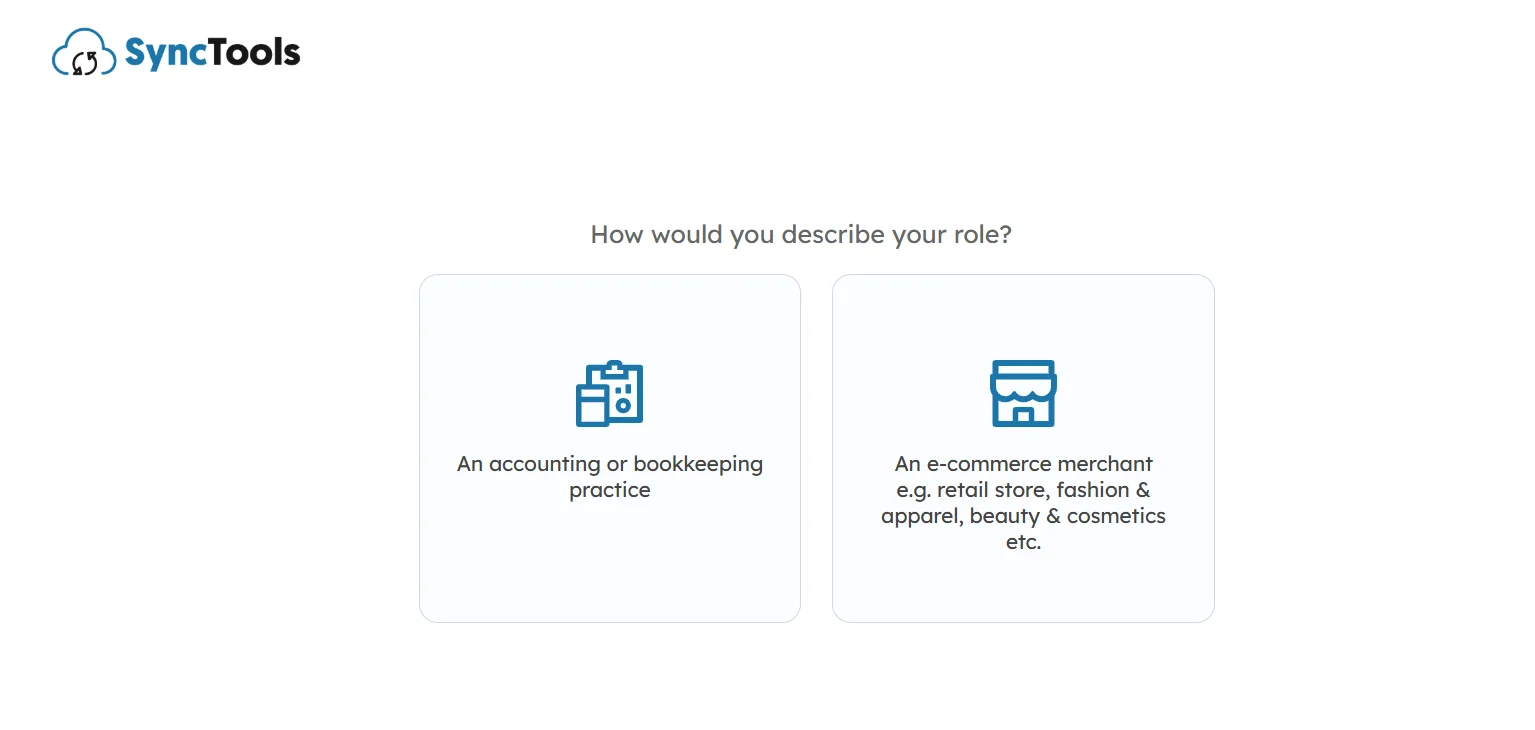
SyncTools role selection screen showing options for accounting practice or e-commerce merchant during onboarding process.
  • SyncTools will ask you to select your role.
  • Choose E-commerce Merchant if you own a Shopify store
  • Choose Accountant/Bookkeeper if you’re handling multiple clients or businesses.

This helps SyncTools tailor the integration process for your needs.

Note: If you’re an accountant or bookkeeper, you can manage multiple businesses under one SyncTools account.

Step 6: Complete Your Registration
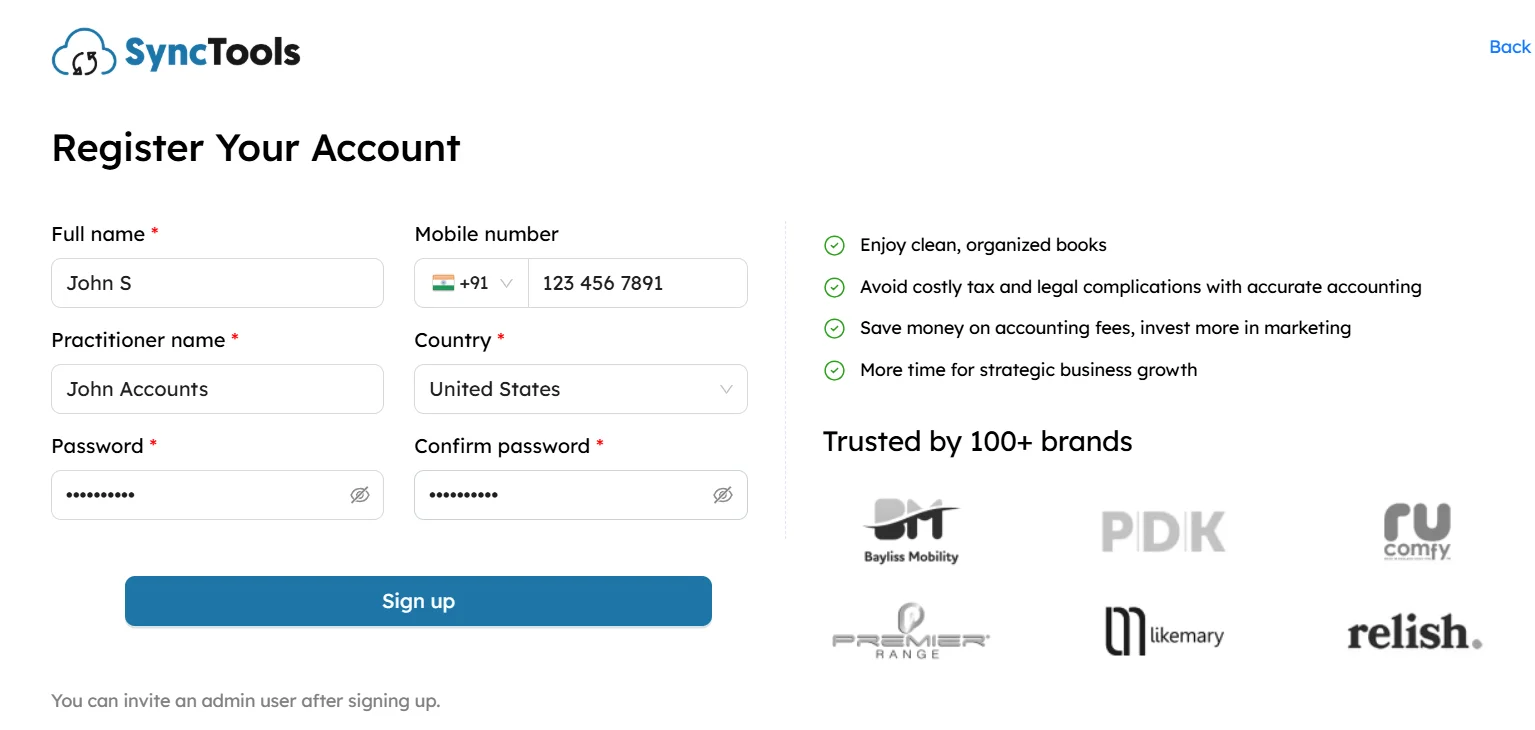
SyncTools account registration form with fields for full name, mobile, country, and password for accountants and e-commerce users.
  • Provide your personal details, including your name and a password for your account.
  • Once completed, click Sign Up to finalize your registration.

Step 7: Invite an Admin (Optional)
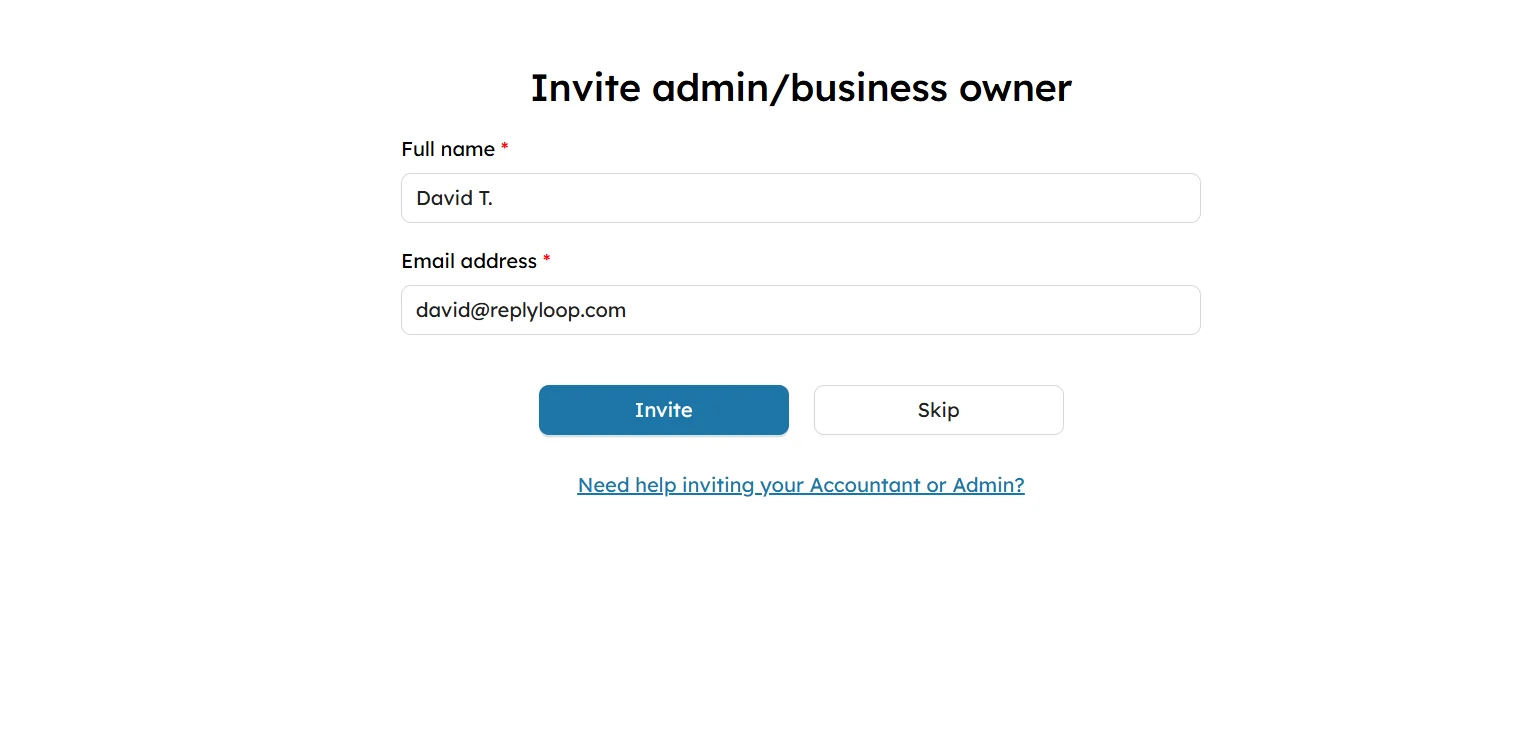
SyncTools invite admin or business owner form showing fields for full name, email address, and options to invite or skip.
  • If you’re working with a team or another business owner, you can invite them to manage the integration by entering their email address.
  • If you’re the sole user, you can skip this step.

Step 8: Welcome to SyncTools!
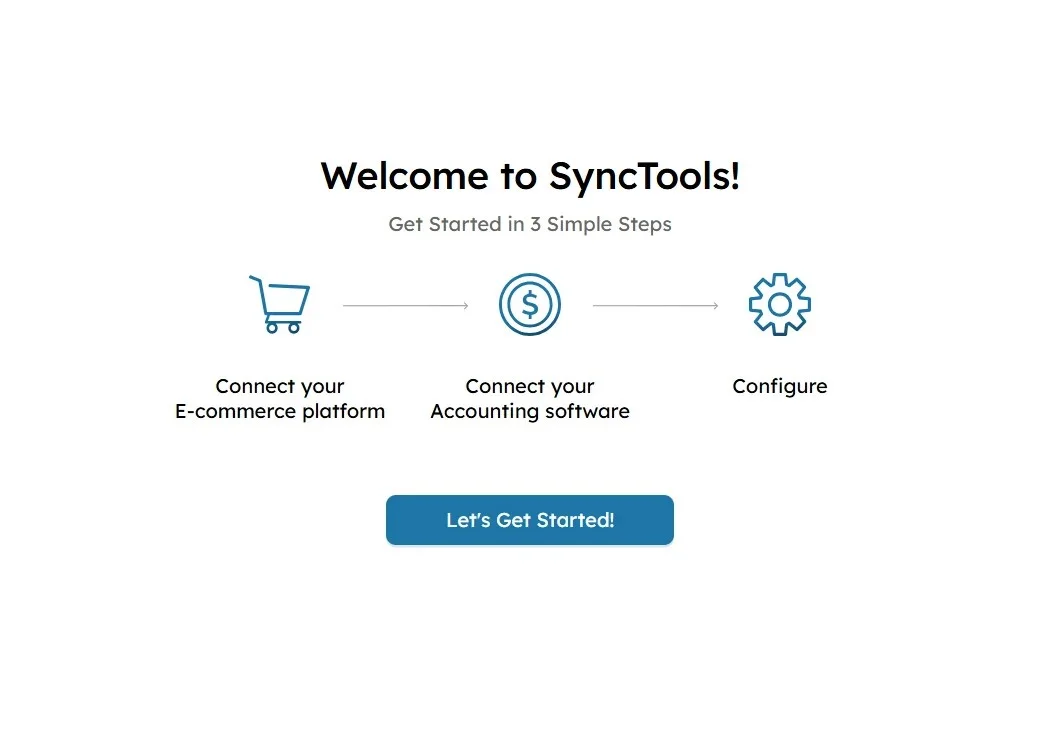
SyncTools welcome screen with 3-step guide to connect e-commerce platform, accounting software, and configure settings.

You’re Almost There!

Now that your account is set up, you’ll be guided through the next steps:

  • Connect your Shopify store
  • Link your Xero account
  • Configure SyncTools for seamless transaction syncing

Click on Let’s Get Started to move on.

Step 9: Connect Shopify and Xero to SyncTools

SSyncTools screen to select eCommerce platform like Shopify and accounting software like Xero for integration setup.
  • On the integration page, select Shopify as your eCommerce platform and Xero as your accounting software.
  • Click Let’s Connect to finalize the integration.
  • SyncTools will automatically sync your Shopify sales data to Xero based on the configuration, simplifying your accounting.
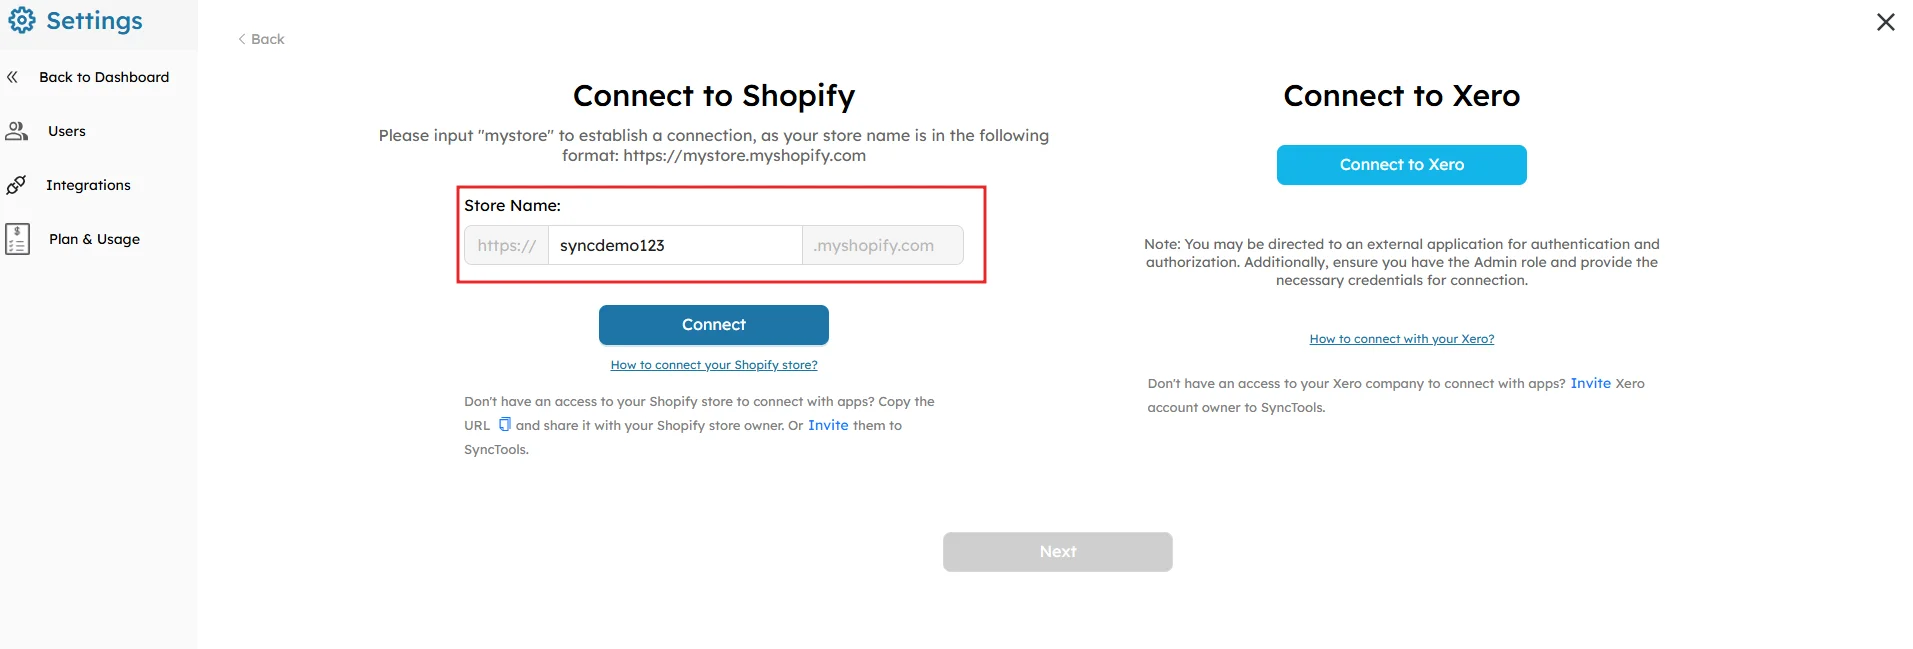
SyncTools interface for connecting Shopify store and Xero accounting software during integration setup process.
  • In the Connect to Shopify section Enter your Shopify store URL (e.g., https://yourstore.myshopify.com).
  • Click Connect once you’ve entered the correct URL to establish the connection between Shopify and SyncTools.
Install SyncTools app on Shopify store with required permissions to view and edit personal and store data.
  • You will be redirected to Shopify’s app page to install SyncTools.
  • Click Install to grant SyncTools the necessary permissions to access your Shopify store data.
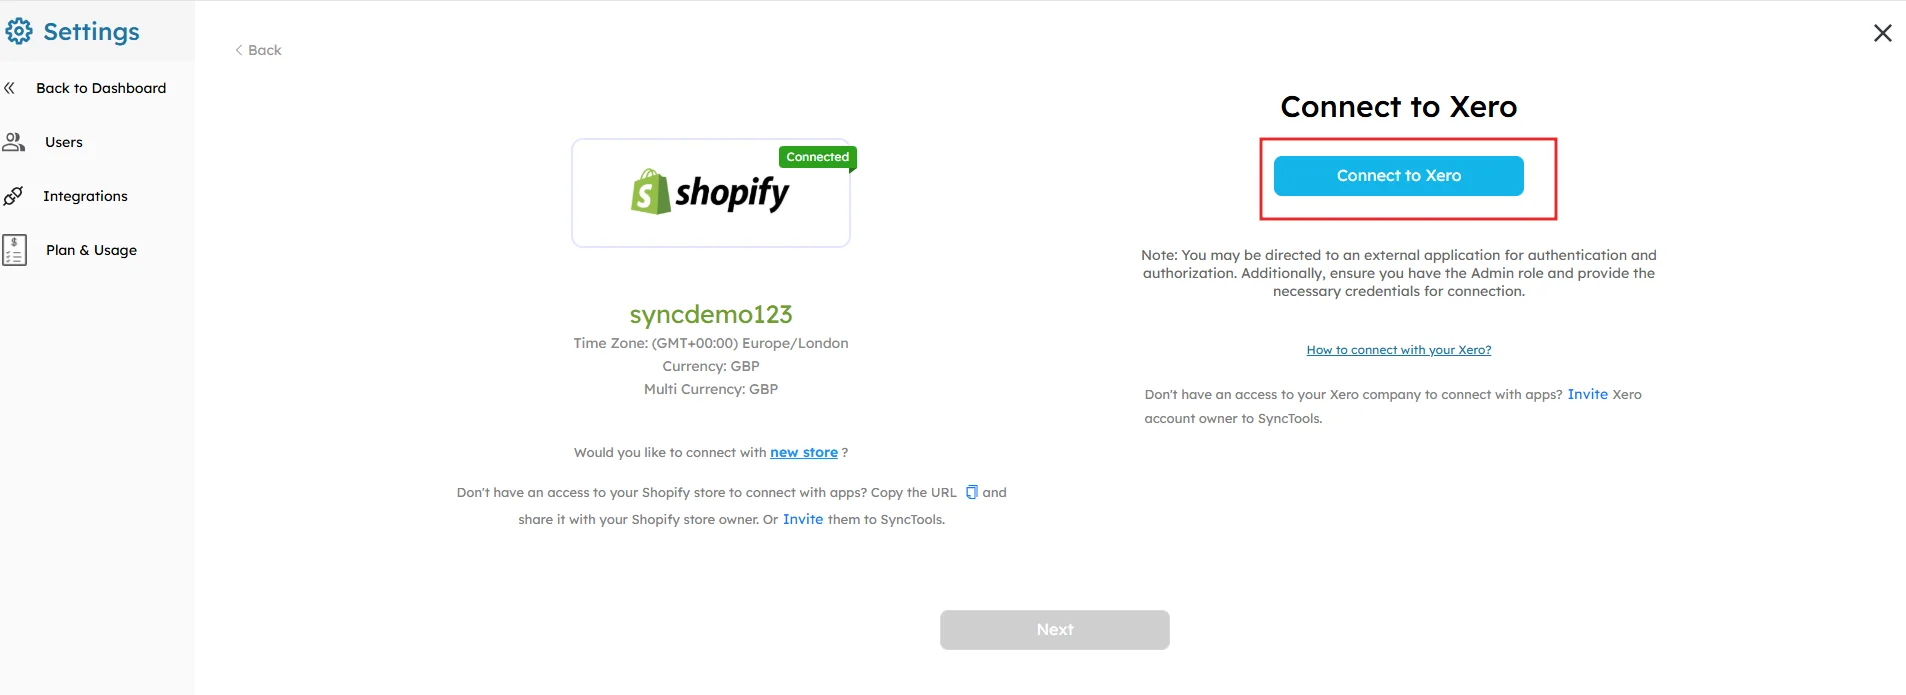
SyncTools Shopify store connected screen with option to integrate Xero accounting software using admin credentials.
  • After connecting to Shopify, you’ll be prompted to connect to Xero.
  • Click Connect to Xero and log in to your Xero account if prompted.
  • You will need to select the Xero organization to sync with.
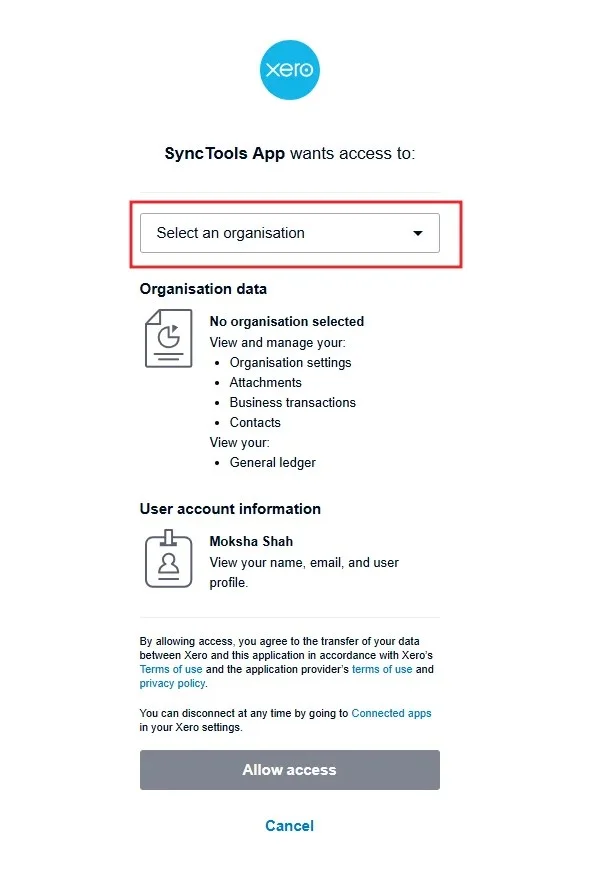
SyncTools Shopify store connected screen with option to integrate Xero accounting software using admin credentials.
  • Once you select the organization, grant SyncTools access to your Xero account by clicking Allow Access.
  • This allows SyncTools to sync your financial data from Shopify directly into Xero.
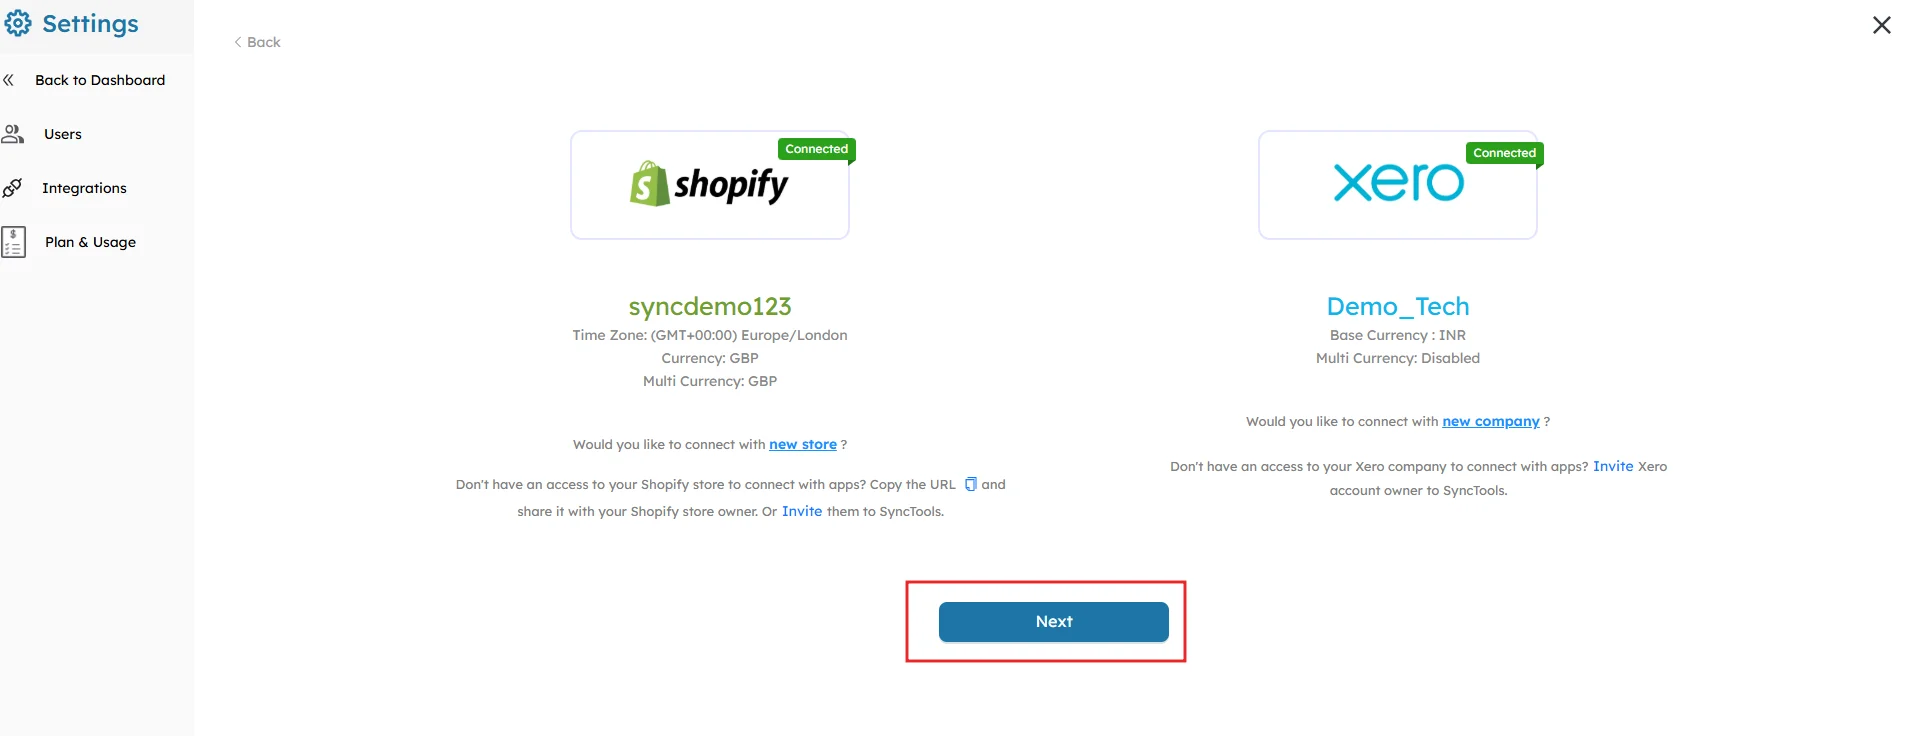
SyncTools dashboard showing Shopify and Xero successfully connected with time zone, currency, and Next button highlighted.
  • After completing the Xero connection, SyncTools will show a confirmation page that both Shopify and Xero are now connected.
  • Click Next to move forward and begin with configuration.

Note: You can connect multiple Shopify stores or Xero companies if needed.

Related Resources 📘

For the information on the , check out the following guide:

  • SyncTools Shopify to Xero Integration Guide: Configuring Summarized Sync

What are your Feelings

  • Happy
  • Normal
  • Sad

Share This Article :

  • Facebook
  • X
  • LinkedIn
Table of Contents
  • Welcome to the SyncTools integration setup guide.
  • Step 1: Start your Free Trial
  • Step 2: Choose Your Platform
  • Step 3: Enter your Email Address
  • Step 4: Verify the email address
  • Step 5: Select Your Role
  • Step 6: Complete Your Registration
  • Step 7: Invite an Admin (Optional)
  • Step 8: Welcome to SyncTools!
  • Step 9: Connect Shopify and Xero to SyncTools
  • Related Resources 📘

QuickBooks Integrations

  • Shopify and QuickBooks
  • WooCommerce and QuickBooks
  • Amazon and QuickBooks
  • eBay and QuickBooks
  • BigCommerce and QuickBooks
  • Walmart and QuickBooks
  • Magento and QuickBooks
  • Linnworks and QuickBooks

XERO Integrations

  • Shopify and Xero
  • WooCommerce and Xero
  • Amazon and Xero
  • eBay and Xero
  • BigCommerce and Xero
  • Walmart and Xero
  • Magento and Xero
  • Linnworks and Xero

Dynamics 365 Integration Guide

  • Shopify and Business Central
  • WooCommerce and Business Central
  • Amazon and Business Central
  • eBay and Business Central
  • BigCommerce and Business Central
  • Walmart and Business Central
  • Magento and Business Central

NetSuite Integrations

  • Shopify and NetSuite
  • WooCommerce and NetSuite
  • Amazon and NetSuite
  • eBay and NetSuite
  • BigCommerce and NetSuite
  • Walmart and NetSuite
  • Magento and NetSuite

Sage Integrations

  • Shopify and Sage
  • WooCommerce and Sage
  • Amazon and Sage
  • eBay and Sage
  • BigCommerce and Sage
  • Walmart and Sage
  • Magento and Sage

SyncTools

  • About Us
  • Customer Reviews
  • Pricing
  • Contact Us
  • Terms & Conditions
  • Privacy Policy
  • Sitemap

Industries

  • SyncTools for Accountants
  • SyncTools for eCommerce
  • SyncTools for SaaS

Resources

  • Knowledge Base
  • Use Cases
  • Demo Videos
  • Blog

Get in Touch

+1 323 672 3738 +44 73803 28797

Copyright © by SyncTools.ai All rights reserved